
The Basics of Siding Installation
New siding protects and preserves your home from frigid temperatures, strong winds, and heavy snowstorms. Getting it installed requires proper planning and scheduling, and factors like material selection and weather conditions impact the project timeline.
Before beginning, contractors inspect the exterior walls to ensure a smooth and seamless installation. Things like dry rot and termite damage may need repair, which adds to the overall project time. Visit https://sidinginstallationlongisland.com/ to learn more.
 While the siding installation crew will try to be careful, it’s a good idea for you to remove anything that could get damaged during the process. This includes garden decorations, grills, outdoor furniture, birdhouses, shed doors and other structures on your property. Also, be sure to move your cars out of the way so they’re not damaged by debris or dirt kicked up during the project.
If you have children, pets or skittish plants that may be afraid of the commotion during the project, consider moving them inside. Not only will this keep them safe from harm, it will also minimize any potential cleanup work afterward. Our contractors are very respectful and will treat your home like they would their own, but it’s always a good idea to be proactive and take the proper precautions to protect your belongings.
In addition, you should clear away anything else that could get in the way of your new exterior walls. This includes tying back bushes and trees that are close to the house’s walls so they don’t accidentally scrape the new siding. If you have flower beds or other landscaping that can get scratched by construction tools, consider covering them with tarps before the crew arrives each day. And don’t forget to cut your grass short prior to installation day; this will make it easier for the crew to spot errant nails and other debris in the yard.
Once the exterior wall is sided, it’s important to make sure the moisture barrier has been properly installed. Many homeowners overlook this step, leading to water infiltration and other costly problems down the road. It’s best to address any issues now before they become more serious.
Depending on the weather, it might be possible to do the whole project in one day. If not, the installation will happen over several days. In order to minimize the amount of time that your yard is closed off, you should prepare for the crew’s arrival by clearing out a convenient area for them to set up and store materials and supplies. Also, be sure to clear your driveway so the crew can park their vehicles safely out of the way.
Materials
Whether you choose wood, vinyl, or another type of siding, a wide variety of materials are available to suit your home’s style and budget. Each material has its own advantages and disadvantages. Wood is a popular option because it’s relatively inexpensive and easy to install. It also looks beautiful and is available in a range of styles, including shiplap, board-and-batten, and traditional horizontal lap. It is durable and can withstand strong winds. However, it can be susceptible to rot and insect damage, and it may require periodic painting or staining.
To prevent moisture damage, a water-resistive barrier is often used under and around all pieces of exterior wall framing, including wall sheathing, furring strips, siding, and even drywall. This barrier helps prevent condensation, mold, and mildew, and it protects against rot and insect infestation.
It is important to have the proper tools and materials for installing your chosen siding. For example, if you’re installing a vinyl wall system, you should have a miter saw with a plywood blade and a standard carbide tip circular saw to cut the siding panels. A jig saw or rotary tool can also be helpful for cutting around obstructions, such as windows and doors.
If you’re using a nail gun to fasten your siding, use galvanized nails or screws with a minimum head diameter of 3/8 inch. You should also install a starter strip and place weep holes in the wall, per manufacturer’s instructions.
When installing a soffit and fascia, start with the lower section first. Nail lengths of J-channel against the inside of the fascia boards, concealing the cut edges. Next, secure the upper section of the fascia with 4D galvanized or pre-painted nails, spaced about a foot apart.
Then, install the top course of siding and soffit and fascia. When you’re installing clapboards, be sure to nail the battens between the studs, and don’t forget to use a nail gun with a’skinny’ tip to avoid splitting the wood. You can also consider beveled clapboards, which have tapered edges rather than the typical straight edge.
If you’re going with a natural, eco-friendly material such as fiber cement or wood, make sure to purchase a larger quantity than you need for your project so you have extra in case of mistakes. For other types of siding, such as metal or stone, check for availability of recycled products to help minimize your environmental footprint.
Installation
The siding installation process begins with the crew removing the existing exterior material. The old material is then scraped, sanded, and prepped for paint or staining. Next, the crew installs insulation and a new foundation cap to protect the structure of your home from moisture and critters. The crew will also install house wrap and weather-resistant barriers to prevent water and sand from seeping into the framing.
A furring strip is then installed around the window or other obstruction to allow for the siding to be attached. This strip should be cut to the size of the obstruction and nailed into the wall at about an inch and a half higher than the bottom of the window. This will provide adequate air flow to keep the wood from cupping or warping. It is important to not skip this step and that the strip be nailed into the studs rather than just the sheathing.
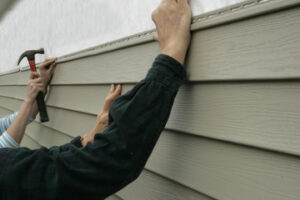
The first row of siding is then custom cut and installed one piece at a time. The panels are nailed into the OSB with hot-dipped galvanized coil nails. These are resistant to rust and are strong against harsh weather conditions. A specialized crew will then install trim pieces and corner posts, as well as soffits, fascia, and gutters. These are all installed in accordance with the manufacturer’s guidelines and to ensure a seamless and waterproof fit.
Once the soffit and fascia are in place, the trim will be nailed into the OSB and caulked where necessary to protect against moisture infiltration. This will also enhance the look of your home and add an extra layer of protection from the elements.
To ensure that the trim is locked into place, a special tool is used called a snap-lock punch. It creates raised notches on the back of the trim that lock into the notches on the bottom edge of the panel above it. This will prevent the panel from shifting or moving and make for a smooth finish around your windows. You may need to remove some of the window casing in order to fit the trim properly, but it is well worth the effort to have a professional and long-lasting result.
Final Inspection
Once the siding is installed, it will be inspected for any damage or issues that need to be addressed. This may include mold, rot or unforeseen structural problems that cannot be addressed at the time of installation but must be fixed promptly to ensure the longevity and performance of your new siding. Depending on the nature of the issue, these repairs will either delay the project or require the contractor to rework and replace existing materials, adding extra cost to your overall project.
Once all of the necessary preparation is complete, your siding installer will order the materials required for your project. Depending on the supplier and availability, this process can take anywhere from a few days to a couple of weeks. If you are working with a trusted and experienced contractor, they will work diligently to get your materials delivered in a timely manner and work around any unexpected challenges that may arise during the installation process.
When the siding is being installed, the crew will follow the manufacturer’s guidelines and best practices for a successful outcome. They will install the appropriate insulation and moisture barriers to help protect against rot, mold and other weather-related issues. In addition, they will make sure that all areas are properly flashed and ventilated to reduce the risk of water infiltration into the walls.
After the installation is completed, your contractor will conduct a final inspection and touch-ups to ensure that all panels are fastened correctly and provide a polished appearance. This will also be the opportunity to address any questions or concerns that you have about the project or the finished product.
A good siding contractor will have the experience and knowledge to help you choose the best material for your home’s needs. They will consider the size and complexity of your home, as well as any specific design or architectural features that you want to incorporate. Once you have made your choice, they will schedule a date and time for the installation to begin. They will also make arrangements to remove any existing gutters and downspouts, so that they have a clean work surface for the installation process.